Well my G8 GT has been having quite the hissy fit this past month. Hours after getting the car back from a warrantied engine rebuild; the alternator warning light pops on and Engineering Mode read 11.5-11.7V. I'm still not convinced this didn't occur during the engine rebuild however the dealer was looking to charge me ~$1000 to have it done. I used a connection at a dealer to get an alternator for ~$300 and decided to install it myself as I've been involved in much more difficult repairs. The following will describe the GM procedure and where I deviated from it to be the most efficient. I've highlighted in red the parts of the procedure I either didn't do, or changed.
The job took ~2h in the freezing cold, If I were to do it again I'd say it could be done in an hour.
GM part numbers that work are as follows:
92191127 - 100A GT alternator with the decoupler
92193199 - 100A GXP alternator without the decoupler (I've been told this works just as well and I wanted to use it, however I could only get the GT one on short notice)
Everything else was 15mm bolts on this job.
Now I found that the best way to pull it out was to unbolt the power steering pump bracket, leaving the hoses attached, and simply moving it off to the side when needed. You may be able to simply remove the power steering pump bolts from the bracket and shift it out of the way but I just unbolted the whole bracket.
The key step that the book does not get into is the fact that the alternator bracket has bushings which close the tolerance to the alternator when the mounting bolts are torqued. You may find that the old alternator is stubborn and wont come out even with all the bolts removed. Take a strong flat-head or a pry-bar and gently pry between the bracket and alternator to break the hold.
Once the alternator is loose, you will find it much easier to remove from the car if you remove the alternator bracket. It's very simple, just remove the 15mm bolt from the idler pulley (keep all the pulley components together as you remove the bolt, this way you don't waste time trying to remember which way each spacer was facing), then there's a single 15mm bolt holding the bracket to the engine block. With the bracket removed you'll be able to snake the old alternator out pretty easily (be careful of the rear of the alternator, there's a sharp piece there and you don't want to cut your hands or any hoses as you remove it).
Now, with the bracket removed from the car you will see the bushings I mentioned in the two bores that the alternator mounting bolts go through. You'll also see that they protrude into the space where the alternator fits. This makes it a pain to try installing the alternator in the car so what we will do is push those bushings the other way so they stick out on the outside of the bracket. I took a short flanged bolt and inserted it into the bushing from the inside of the bracket, then I took a metal rod (1/4" extension actually) which fit through the other hole in the bracket and I hammered at the bolt until the bushing was flush with the inside face.
Now you can insert the alternator in before you re-install the bracket. Just get it down into the engine bay while you have the extra room. Then install the bracket loose so you have a little extra wiggle room when installing the alternator. I inserted the lower bolt first which allowed me to rotate the alternator up and install the upper bolt. The rear bolt on the alternator is the short one, it basically self aligns with the bracket already attached to the engine so it's pretty straightforward, though don't forget that there's a wiring harness clip that bolts up at this point too. The final alternator connection is the power cable which is the one held on by the 12mm nut.
Once you're at that point it's just a matter of snugging up all the bolts on the alternator, re-bolting the power steering pump bracket, and installing the idler pulley.
Don't forget some obvious things like re-attaching the air cleaner, connecting any sensors that needed disconnecting, re-installing the serpentine belt properly etc.
Hope this helps some people and if anyone has any questions, feel free to ask.
The job took ~2h in the freezing cold, If I were to do it again I'd say it could be done in an hour.
GM part numbers that work are as follows:
92191127 - 100A GT alternator with the decoupler
92193199 - 100A GXP alternator without the decoupler (I've been told this works just as well and I wanted to use it, however I could only get the GT one on short notice)
I personally raised the front left of the car and removed the wheel to access the nut that holds the electrical cable to the alternator easier but it is reachable from above. It is a 12mm nut.
- Disconnect the battery negative cable. Refer to Battery Negative Cable Disconnection and Connection.
- Remove the engine cover. Refer to Engine Cover Replacement.
- Remove air filter assembly. Refer to Air Cleaner Assembly Replacement.
- Remove the induction tube from throttle body. Refer to Air Cleaner Inlet Duct Replacement.
- Remove the mass air flow (MAF) sensor. Refer to Mass Airflow Sensor with Intake Air Temperature Sensor Replacement.
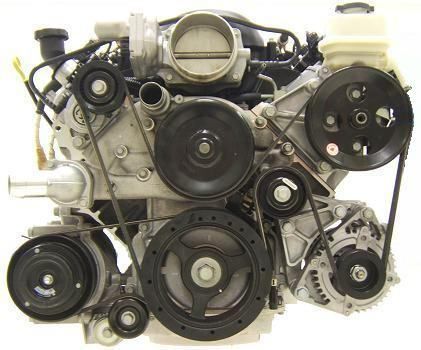
- Remove the drive belt. Refer to Drive Belt Replacement - Accessory.
![Image]()
- Remove the power steering pump to power steering hose banjo bolt (1). Note: Bolts with micro-encapsulated thread sealant must be discarded after removal.
- Remove the power steering pump to power steering pump bracket retaining bolts (2).
- Discard the bolts.
- Place the power steering pump to allow access to the alternator.
![Image]()
- Remove the alternator battery positive cable nut (1) from the alternator.
- Remove the alternator battery positive cable (2) from the alternator stud. Note: Press the retainer tabs to remove electrical connector.
- Remove the electrical connector (3) from the alternator.
![Image]()
- Remove the alternator retaining bolts (1, 2).
- Remove the alternator (3) from the vehicle.


Everything else was 15mm bolts on this job.
Now I found that the best way to pull it out was to unbolt the power steering pump bracket, leaving the hoses attached, and simply moving it off to the side when needed. You may be able to simply remove the power steering pump bolts from the bracket and shift it out of the way but I just unbolted the whole bracket.
The key step that the book does not get into is the fact that the alternator bracket has bushings which close the tolerance to the alternator when the mounting bolts are torqued. You may find that the old alternator is stubborn and wont come out even with all the bolts removed. Take a strong flat-head or a pry-bar and gently pry between the bracket and alternator to break the hold.
Once the alternator is loose, you will find it much easier to remove from the car if you remove the alternator bracket. It's very simple, just remove the 15mm bolt from the idler pulley (keep all the pulley components together as you remove the bolt, this way you don't waste time trying to remember which way each spacer was facing), then there's a single 15mm bolt holding the bracket to the engine block. With the bracket removed you'll be able to snake the old alternator out pretty easily (be careful of the rear of the alternator, there's a sharp piece there and you don't want to cut your hands or any hoses as you remove it).
Now, with the bracket removed from the car you will see the bushings I mentioned in the two bores that the alternator mounting bolts go through. You'll also see that they protrude into the space where the alternator fits. This makes it a pain to try installing the alternator in the car so what we will do is push those bushings the other way so they stick out on the outside of the bracket. I took a short flanged bolt and inserted it into the bushing from the inside of the bracket, then I took a metal rod (1/4" extension actually) which fit through the other hole in the bracket and I hammered at the bolt until the bushing was flush with the inside face.
Now you can insert the alternator in before you re-install the bracket. Just get it down into the engine bay while you have the extra room. Then install the bracket loose so you have a little extra wiggle room when installing the alternator. I inserted the lower bolt first which allowed me to rotate the alternator up and install the upper bolt. The rear bolt on the alternator is the short one, it basically self aligns with the bracket already attached to the engine so it's pretty straightforward, though don't forget that there's a wiring harness clip that bolts up at this point too. The final alternator connection is the power cable which is the one held on by the 12mm nut.
Once you're at that point it's just a matter of snugging up all the bolts on the alternator, re-bolting the power steering pump bracket, and installing the idler pulley.
Don't forget some obvious things like re-attaching the air cleaner, connecting any sensors that needed disconnecting, re-installing the serpentine belt properly etc.
Hope this helps some people and if anyone has any questions, feel free to ask.