Pontiac G8 Forum banner
161 - 180 of 198 Posts
At some not well defined point in 09 they switched from the 08 valve to a different one. I needed the newer one.
 
SOOOOO...yeah.....I did it this past weekend...Dropped the subframe and all. Took about 4 hours as both my forward subframe bolts were seized....I have a scanner so after the job I cleared the code and went to fill the tank. One of the symptoms I was having in addition to the engine light was that the tank was a pain to fill. The pump would keep shutting off no matter what I tried or were I got gas. Like there was too much back pressure or something. Well first time I filled up was great. Everything worked fine. This lasted about 3 fill ups or a week. Then I'm driving today and the check engine light comes on and sure enough I go to fill the tank and again pump issues. Is it possible this thing failed already or is something else wrong. There are no other codes but a P0446 that is hitting. Between this and a two month delay on getting lower control arms because SuperPro can't make them fast enough is killing me.
 
You wouldn't think that a new component would fail on you that fast. But it reads as thou that is what has happened. It would be nice to know that the charcoal canister is not plugged up in any way, as well as the line from it to the vent valve, is not physically plugged or pinched closed (due to routing). My thinking, is that a vent valve *not* being open when it should be (to allow for air pressure in the tank to escape when required) especially when refueling, could/would produce the same effect, if the canister or vent line were plugged. At least that's the way I see it.
 
Well $750 later at the dealership and it turned out to be the fuel tank pressure sensor. They had to drop the tank.
The fuel tank pressure sensor retails for around $35 shipped so would it have been feasible to pay their diagnostic fee of say $99, order the sensor and replace it yourself? Did they have to drop the fuel tank to verify the operation/non-operation of the sensor? At any rate, although costly, good the issue has been resolved. For what it is worth...
GM Original Equipment ACDelco GM Original Equipment Fuel Tank Pressure Sensors are one component of the vehicle's evaporative emissions control system. The sensor measures pressure changes within the fuel tank in order to alert the vehicle's engine management computer when there is a leak in the fuel system. These sensors can identify leaks so they can be repaired quickly for both safety reasons and to help save on fuel costs. These original equipment sensors have been manufactured to fit your specific GM vehicle, providing the same performance, durability, and service life you expect from General Motors.
 
Yeah they had to drop the tank to verify the fault. The issue was they had to remove the exhaust and ended up having to cut the bolts off the CAT's as they were frozen. Plus working on my garage floor I just didn't have enough room to get under the car and drop everything....I do most work myself but this is one I had to eat. They got me good for fees but what can you do.
 
Thanks for the how to. I recently replaced the evap solenoid with the help of my brother who was a mechanic once upon a time.
Without his help I would've never been able to do it.

It took about two hours with two guys with large hands & without dropping the cradle and with some help from some sort of clamp tool with a cable attached that was used to pinch the hose clamp on the back side of the solenoid.

Okay, after recently buying my car my CEL came on(P0449), sadly it turned out to be the Evap vent solenoid. Turns out that tons of other GM vehicles have this problem. I took the car to the dealer and was slammed with an estimate of $1000 to replace the vent solenoid. (I ended up taking the car back and paying the diagnostic fee /forums/images/smilies/frown.gif ) After looking on the forums I found that some other members had this issue and could be resolved with out dropping the tank.

The part cost $15.00 shipped on Amazon. P/N :214-2147 (this part number worked for my 08 GT) 2009 G8's might have a different part number.
Links to various sites

https://www.acdelcodirect.com/products/emission-control/evaporative-system/214-2147

[ame]http://www.amazon.com/ACDelco-214-2147-Service-Vapor-Canister/dp/B0031IBSDG/ref=sr_1_1?ie=UTF8&qid=1382406665&sr=8-1&keywords=214-2147[/ame]
Time needed : 1-2 hrs ( took me 35 minutes)


Tools needed:
lug wrench
Jack and Jack stand
long Needle noise pliers
Flat head screw driver

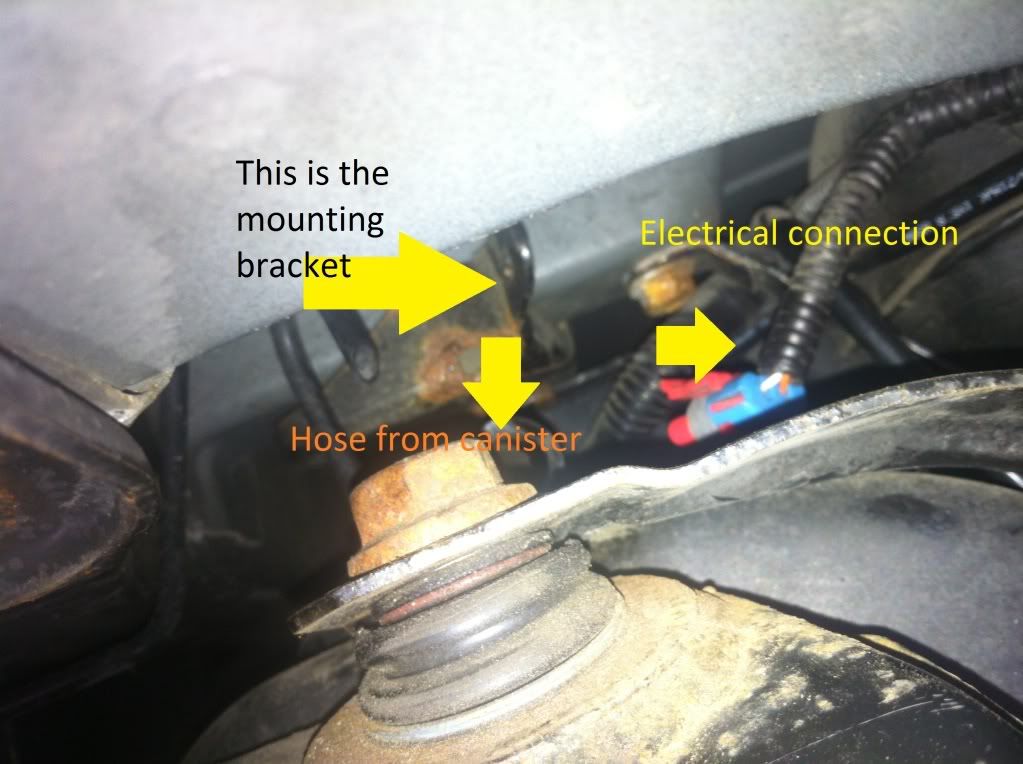
Doing it this way requires you to work by feel since its in a weird spot. The pictures I took should give you a visual of what you are looking at.

step 1: Jack car up and take rear passenger side wheel off.
step 2: Locate the 2 hoses from the gas tank filler neck and disconnect
them. ( The plastic hose will have has two tabs that need to be squeezed in and pulled to take it out(see pictures)
step 3: Locate solenoid and disconnect electrical wire by lifting the tab and pulling down
step 4: Hold solenoid firmly and pull towards yourself to slide it off the bracket.
step 5: Using the long needle noise squeeze the hose clamp off the vent hose and pull off the solenoid. At this point the solenoid should be freed
Step 6: maneuver the solenoid out of the car (should come out where you took the filler neck hoses off)
Step 7: Reinstall in reverse order( I used a hose clamp on the vent hose for easier installation) A little bit of oil on the hose will help the install go smother.
Image


Image


Technical chat.
After taking out the defective solenoid I checked the Ohms and it was reading 10.9 ohms, The new one however was reading 22.0 ohms.

Also Your Check engine light might not come off untill 3 Cold start cycles (on star says up to one week), I happen to have a Scanner that I can clear codes with.


Hope this helps someone and questions feel free to message me.
 
So I dropped my '08 off at the dealership last night to have the evap solenoid done. (I don't have space to do this on my own)

They called me today to give me an update.

They had finished with their diagnostics, and confirmed that the solenoid needed changed. The service manager was breaking down what they needed to do (drop cradle, yadda, yadda). He then states that he can't give me an estimate of the cost, as the work involved labor and materials. He proceeds to explain why:

The last couple of these that they've done, have all had the cradle bolts snap off, and need to be drilled. The last one they did took over two weeks, and came to a grand total of $4600.

Needless to say, I'm picking the car up tomorrow.

Has anyone heard of these bolts snapping off?

I'm going to end up finding a way to change this myself. If dropping the cradle isn't an option, I'll do what I need to. I'll use a small die grinder to cut the broken solenoid into pieces if I have to.
 
.... He then states that he can't give me an estimate of the cost, as the work involved labor and materials. He proceeds to explain why:

The last couple of these that they've done, have all had the cradle bolts snap off, and need to be drilled. The last one they did took over two weeks, and came to a grand total of $4600.

Needless to say, I'm picking the car up tomorrow.

Has anyone heard of these bolts snapping off?....
Yikes. $4600 to replace a $30 part is utterly insane. Can't blame you on retrieving the vehicle and seeking means outside of the dealership to resolve the problem. Have read about cradle bolts rusting and breaking, but am not sure if a penetrating lubricant was used prior to attempting to extract the bolts. Used as in spraying the area and letting it soak for a few hours. Spraying again and waiting a few more hours versus spraying and giving the lubricant mere minutes to break through the rust. Bolts frequently exposed to natural elements have a greater likelihood of breaking upon removal especially if rust has seized the bolt in/to the threads. Good luck
 
I just found it odd that they have snapped the cradle bolts on a few cars. I've read a several threads about cradle removal, and didn't see any instance of a DIY job snapping the bolts.

I have until October before it is required to be done, so I have time. I just need to find a lift I can use.
 
I just found it odd that they have snapped the cradle bolts on a few cars. I've read a several threads about cradle removal, and didn't see any instance of a DIY job snapping the bolts.

I have until October before it is required to be done, so I have time. I just need to find a lift I can use.
Its probably the air impacts they're using. I've done 2 cradle swaps, one removing the bolts with a breaker bar and the other with my Milwaukee electric impact. They put a lot of thread locker on those bolts but they still came out relatively smoothly.
 
Heard some guys were using air impacts to put on oil drain plugs so this wouldn't be the least bit surprising. Guess the few seconds saved is worth both the hassle and added expensive which is ultimately passed onto the consumer. Don't even want to get started on what they do to lug nuts... shaking my head. Still cannot fathom how the repair bill totaled $4600 and guess we may never know.
 
A pair of hose clamp pliers was invaluable when I replaced the solenoid last month. Once everything else was off except the hose in the back of the solenoid it still took a while to get this thing on the clamp due to lack of space... But it was done without dropping the cradle & about 2 hours from start to finish
 

Attachments

✅ I did the same thing by Removing the Filler Hose

I did the same thing and removed the Filler Hose...

I tried just doing it by taking the wheel off, but had to drop the cradle a bit. I only loosened the driver side bolts about 1/2 way, but took out the passenger side altogether. If I recall correctly, the passenger side muffler or both need to be undone at the hanger.

Fortunately, I have average-size meat hooks, so after I dropped the cradle, it was relatively straight-forward.

If your doing it on a creeper, it’s a bitch. It’s easier to just be plain ‘ol on the ground. Jack that sucker up (all 4 corners is a must) as high as your mechanic’s jack and jackstands allow. If you only have beginner jack-stands, I suggest you either borrow or purchase some man-sized 20”-30” high stands. If your jack is straining to get the car high enough, use a 4x4 or 6x6 to get that sucker up as high as you can.

You want to be off the ground as far as possible, because you absolutely need room to maneuver underneath the car. I mean you need to be able to do a complete 360 while on the ground ! Put a movers blanket or something under the car to be comfortable.

Email or Text me if you need guidance at:
(610) 842-7905
gto3deuces@gmail.com

Good Ruck !
Dave - GTO3DEUCES

 
✅ For anyone struggling with the metal bracket that holds the canister ✅

✅ For anyone struggling with the metal bracket that holds the canister

I too struggled with pulling the canister off of the metal self-locking tabbed bracket.

May I suggest...

A> Don’t fight it, just rip it off it cut it off with a Dremel or similar device.

B> Get yourself a similar length of plumbers pipe strapping or similar metal, and some self-tapping zip screws (nice ones that won’t strip the Phillips-Head while your setting it in), then fabricate a replacement strap or wrap the canister with the plumbers pipe strapping and fasten it to the remaining piece of the original bracket that remains OR fasten it elsewhere. You could always lengthen the hoses and electrical connections, Right ?

C> Finally, use 12”-15” Ty-Wraps to secure the canister to the new strap.

D> Or, using your own wits, rig-up some sort of similar method to secure the canister to the undercarriage.

*** NOTE ***
MAKE ABSOLUTELY CERTAIN THAT ALL HOSES + ELECTRICAL CONNECTIONS ARE SECURED FIRMLY !

UTILIZE TY-WRAPS TO SECURE THE HOSES AND ELECTRICAL CONNECTIONS !

DO NOT SKIMP OR BE SHY TO USE AS MANY TY-WRAPS AS IT TAKES TO FINALIZE REPAIRS !

TRUST ME, YOU DO NOT WANT TO REVISIT THIS EXPERIENCE EVER AGAIN !

If you would like guidance or feedback, Email or Text me at:
(610) 842-7905
gto3deuces@gmail.com

Good Ruck !
Dave - GTO3DEUCES


I attempted this repair last weekend and struggled to get the metal hose clamp off for 2 hours before having to give up. I tried to loosen the bolts and drop the subframe but didn't have the power in my impact. So just a couple questions as i am going to fix it this weekend:
1. Can i just lower the subframe with the four bolts or are there other brackets i need to remove? (Shocks, exhaust hangers)
2. Has anyone had trouble reusing the TTY bolts? I can always order them and replace them when they come in if needed.
 
I'm undertaking this project right now as my 09 has 100800 miles on it, I initially got the part for an 08. Now have ACDelco 214-2164 from Amazon on it's way, in the next few days I'm going to lower the cradle as there is no way in hell I can get my hands under there. I got the fuel/vent line off just fine.........time will shot if it will be a ****show or not.
 
Mine still give me P0446, so it goes to the dealer now. I'm tired of dealing with it. OR I will buy the Kia Stinger GT2..........
 
Can someone post pictures of the bolts they loosened to let the subframe down, and also where are you putting the jack if the subframe is being loosened from the car?

I started this project today and eventually got the canister out without loosening the subframe. But when the part comes in, I’m not feeling confident about getting it back in and that back hose seems like it’ll be a pain again.

Thank you to everyone who contributed to this thread!
 
161 - 180 of 198 Posts